
Optical ray tracing for luminescent materials and spectral converter photovoltaic devices
pvtrace is a statistical photon path tracer written in Python. Rays are followed through a 3D scene and their interactions with objects are recorded to build up statistical information about energy flow.
This is useful in photovoltaics and non-imaging optics where the goal is to design systems which efficiently transport light to target locations.
One of its key features is the ability to simulate re-absorption in luminescent materials. For example, like in devices like Luminescent Solar Concentrators (LSCs).
A basic LSC can be simulated and visualised in five lines of code,
from pvtrace import *
lsc = LSC((5.0, 5.0, 1.0))  # size in cm
lsc.show()                  # open visualiser
lsc.simulate(100)           # emit 100 rays
lsc.report()                # print report
This script will render the ray-tracing in real time.
For much larger simulations pvtrace now ships a compiled ray-tracing engine which traces the same physics in native, multi-threaded code — hundreds of times faster — and pvtrace studio, a browser app for building scenes and exploring results. See Fast ray tracing and pvtrace studio below.
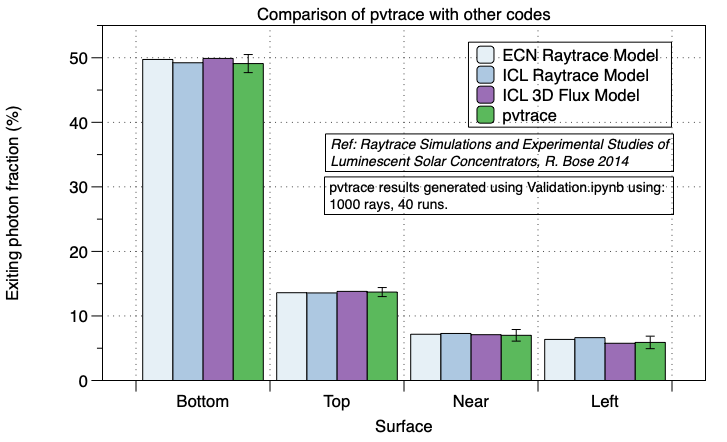
pvtrace has been validate against three other luminescent concentrator codes. For full details see Validation.ipynb notebook
pvtrace needs Python 3.10 or later.
Create a clean virtual environment using pyenv and install from PyPI,
pyenv install 3.12.4
pyenv virtualenv 3.12.4 pvtrace-env
pyenv activate pvtrace-env
pip install pvtrace
conda create --name pvtrace-env python=3.12
conda activate pvtrace-env
pip install pvtrace
This gives you the photon path tracer, the Python API and the pvtrace-cli command line tool. To go faster, or to use the studio app, read on.
The compiled engine is built from source because it needs a C compiler. On MacOS install OpenMP first,
brew install libomp
Then clone the repository, install the build dependencies and build the kernel,
git clone https://github.com/danieljfarrell/pvtrace.git
cd pvtrace
pip install -e ".[engine]"
python -m pvtrace.engine.build
Check that it worked,
python -c "import pvtrace.engine as e; print(e.is_available())"
Studio is the browser app for building scenes and exploring results. It needs the fast engine (above) plus a few extra packages,
pip install -e ".[studio]"
Download the hello_world.py example script either manually or using curl,
# Download example script
curl https://raw.githubusercontent.com/danieljfarrell/pvtrace/master/examples/hello_world.py > hello_world.py
Now active your python environment!
If you installed using pyenv do the following,
pyenv local pvtrace-env
If you are using conda to this,
conda activate pvtrace-env
Now start the meshcat server with the command,
meshcat-server
This will print information like,
zmq_url=tcp://127.0.0.1:6000
web_url=http://127.0.0.1:7000/static/
Open a new terminal window and again activate your pvtrace-env.
Open hello_world.py and make sure the line below has zmq_url of your meshcat-server,
# Change zmq_url here to be the address of your meshcat-server!
renderer = MeshcatRenderer(
    zmq_url="tcp://127.0.0.1:6000", wireframe=True, open_browser=True
)
You can now run pvtrace scripts! Run this following command,
python hello_world.py
Also take a look at the online Jupyter notebook tutorial series which provide an overview of pvtrace and examples,
- Quick Start.ipynb, an interactive ray-tracing tutorial (download an run locally)
- Materials.ipynb, include physical properties with materials
- Lights.ipynb, place photon sources in the scene and customise their properties
- Nodes.ipynb translate and rotate scene objects with nodes
- Geometry.ipynb define the shapes of objects in your scene
- Coatings.ipynb introduce custom reflections with coatings
Download and run these notebooks locally for a more interactive experience, but first install jupyter,
pip install jupyter
or with conda,
conda install jupyter
Then launch the jupyter notebook,
jupyter notebook
The original photon tracer follows one ray at a time in Python. The compiled engine traces the same physics — the same absorption, emission and Fresnel events — in native code across all of your CPU cores. For scenes built from boxes, spheres and cylinders it is hundreds of times faster.
import time
import functools
import numpy as np
from pvtrace import *
from pvtrace.algorithm import photon_tracer
import pvtrace.engine as engine

# A glass sphere floating in air
world = Node(name="world", geometry=Sphere(radius=10.0, material=Material(refractive_index=1.0)))
sphere = Node(name="sphere", geometry=Sphere(radius=1.0, material=Material(refractive_index=1.5)), parent=world)
sphere.location = (0, 0, 2)
light = Node(name="light", light=Light(direction=functools.partial(cone, np.pi / 8)), parent=world)
scene = Scene(world)

# The photon path tracer: one ray at a time in Python
tic = time.time()
for ray in scene.emit(1000):
    photon_tracer.follow(scene, ray)
print(f"python tracer: {1000 / (time.time() - tic):>10,.0f} rays/s")

# The compiled engine: the same scene, traced in native code
result = engine.simulate(scene, 1_000_000)
print(f"engine:        {1_000_000 / result.elapsed:>10,.0f} rays/s")
On a laptop this prints something like,
python tracer:      1,800 rays/s
engine:           460,000 rays/s
about 250 times faster, and larger scenes reach millions of rays per second (see benchmarks/benchmark_engine.py).
Rather than storing every ray, the engine tallies statistics on the surfaces and volumes you care about using recorders,
from pvtrace.engine import Recorder, Histogram

# Record the spectrum of rays leaving the scene
world.recorders = [
    Recorder("escaped", event="exit", histograms=[Histogram("wavelength", 400, 800, 40)])
]
result = engine.simulate(scene, 1_000_000)
escaped = result.recorders["escaped"]
print(escaped.rays, "rays escaped, mean wavelength", round(escaped.mean("wavelength"), 1), "nm")
The compiled engine understands the subset of pvtrace that the scene description language can express: box, sphere and cylinder shapes, Fresnel and null surfaces, and absorber, scatterer, luminophore and reactor components. Scenes that use meshes or custom Python surfaces fall back to the photon path tracer automatically.
Scenes can be described in a YAML file and traced without writing any Python. Save this as scene.yml,
version: "1.0"
nodes:
  world:
    sphere:
      radius: 10.0
      material:
        refractive-index: 1.0
  ball-lens:
    location: [0, 0, 2]
    sphere:
      radius: 1.0
      material:
        refractive-index: 1.5
  green-laser:
    light:
      wavelength: 555
      mask:
        direction:
          cone:
            half-angle: 22.5
Trace it and query the results,
# Trace the scene; results are written to scene.sqlite3
pvtrace-cli simulate scene.yml

# How many rays entered the lens?
pvtrace-cli count entering ball-lens scene.sqlite3

# The spectrum and time-of-flight of those rays
pvtrace-cli spectrum entering ball-lens scene.sqlite3
pvtrace-cli time entering ball-lens scene.sqlite3
Results are stored in a standard SQLite database, so you can also open them with any SQLite tool.
Studio is a local web app for building scenes, running simulations and exploring the results as live spectra, angular distributions and heatmaps painted directly onto the geometry. Install the studio and engine dependencies (see Install), then point it at a scene,
pvtrace-cli studio examples/studio_lsc.yml
This opens a browser with a 3D view of the scene, an editable inspector and the scene document side by side. Press Run and the recorders fill in real time. Tick real time and drag an object to watch the results update as you move it.
pvtrace supports 3D ray optics simulations shapes,
- box
- sphere
- cylinder
- mesh
The optical properties of each shape can be customised,
- refractive index
- absorption coefficient
- scattering coefficient
- emission lineshape
- quantum yield
- surface reflection
- surface scattering
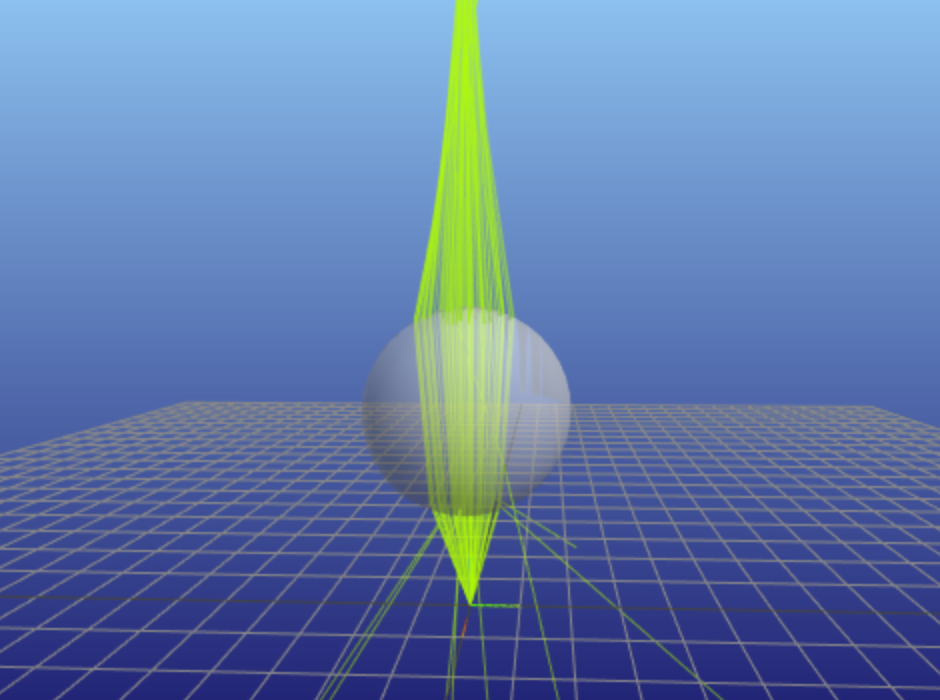
pvtrace has a high-level API for handling common problems with LSCs and a low-level API where objects can be positioned in a 3D scene and optical properties customised.
For example, a script using the low-level API to ray trace this glass sphere is below,
import time
import sys
import functools
import numpy as np
from pvtrace import *

# World node contains all objects
world = Node(
    name="world (air)",
    geometry=Sphere(
        radius=10.0,
        material=Material(refractive_index=1.0),
    )
)

# The glass sphere
sphere = Node(
    name="sphere (glass)",
    geometry=Sphere(
        radius=1.0,
        material=Material(refractive_index=1.5),
    ),
    parent=world
)
sphere.location = (0, 0, 2)

# The source of rays
light = Node(
    name="Light (555nm)",
    light=Light(direction=functools.partial(cone, np.pi/8)),
    parent=world
)

# Render and ray-trace
renderer = MeshcatRenderer(wireframe=True, open_browser=True)
scene = Scene(world)
renderer.render(scene)
for ray in scene.emit(100):
    steps = photon_tracer.follow(scene, ray)
    path, events = zip(*steps)
    renderer.add_ray_path(path)
    time.sleep(0.1)

# Wait for Ctrl-C to terminate the script; keep the window open
print("Ctrl-C to close")
while True:
    try:
        time.sleep(.3)
    except KeyboardInterrupt:
sys.exit()pvtrace is designed in layers each with as limited scope as possible.
- Scene
- Graph data structure of node and the thing that is ray-traced.
- Node
- Provides a coordinate system, can be nested inside one another, perform arbitrary rotation and translation transformations.
- Geometry
- Attached to nodes to define different shapes (Sphere, Box, Cylinder, Mesh) and handles all ray intersections.
- Material
- Attached to geometry objects to assign physical properties to shapes such as refractive index.
- Surface
- Handles details of interaction between material surfaces and a customisation point for simulation of wavelength selective coatings.
- Components
- Specifies optical properties of the geometries volume, absorption coefficient, scattering coefficient, quantum yield, emission spectrum.
- Ray-tracing engine
- The algorithm which spawns rays, computes intersections, samples probabilities and traverses the rays through the scene.
pvtrace has two ray-tracing engines. The photon path tracer is physically accurate down to individual absorption and emission events, and handles any geometry including meshes and custom surfaces, but follows rays one at a time in Python so it is slow. The compiled engine traces the same physics in native, multi-threaded code for the subset of scenes the description language can express, and is hundreds of times faster. See Fast ray tracing.
Interactive Jupyter notebooks are in examples directory, download and take a look, although they can be viewed online.
Please use the github issue tracker for bug fixes, suggestions, or support questions.
If you are considering contributing to pvtrace, first fork the project. This will make it easier to include your contributions using pull requests.
- First create a new development environment using MacOS instructions or Linux and Windows instructions, but do not install pvtrace using pip! You will need to clone your own copy of the source code in the following steps.
- Use the GitHub fork button to make your own fork of the project. This will make it easy to include your changes in pvtrace using a pull request.
- Follow the steps below to clone and install the development dependencies
# Pull from your fork
git clone https://github.com/<your username>/pvtrace.git

# Get development dependencies
pip install -r pvtrace/requirements_dev.txt

# Add local `pvtrace` directory to known packages
pip install -e pvtrace

# Run units tests
pytest pvtrace/tests

# Run an example
python pvtrace/examples/hello_world.py
You should now be able to edit the source code and simply run scripts directly without the need to reinstall anything.
Please add or modify an existing unit tests in the pvtrace/tests directory if you are adding new code. This will make it much easier to include your changes in the project.
Pull requests will be considered. Please make contact before doing a lot of work, to make sure that the changes will definitely be included in the main project.
You can get in contact with me directly at dan@excitonlabs.com or raise an issue on the issue tracker.
Installed automatically with pip install pvtrace,
- python >= 3.10
- numpy
- pandas
- trimesh[easy]
- meshcat >= 0.1.1
- anytree
- typer, pyyaml, jsonschema, scipy, termplotlib (for the
pvtrace-clicommand line tool)
The fast engine additionally needs cython and a C compiler (pip install "pvtrace[engine]"), and studio needs fastapi, uvicorn, websockets and ruamel.yaml (pip install "pvtrace[studio]").