Kick-start building top-tier B2B & B2C cloud SaaS products with sleek design, fully localized and accessible, vertical slice architecture, automated and fast DevOps, and top-notch security.
Built to demonstrate seamless flow: backend contracts feed a fully-typed React UI, pipelines make fully automated deployments to Azure, and a multi-agent workflow built on Claude Code's native Agent Teams where PlatformPlatform-expert agents collaborate to deliver complete features following the opinionated architecture. Think of it as a ready-made blueprint, not a pile of parts to assemble.
- Backend - .NET 10 and C# 14 adhering to the principles of vertical slice architecture, DDD, CQRS, and clean code
- Frontend - React 19, TypeScript, TanStack Router & Query, ShadCN 2.0 with Base UI for accessible UI
- CI/CD - GitHub actions for fast passwordless deployments of docker containers and infrastructure (Bicep)
- Infrastructure - Cost efficient and scalable Azure PaaS services like Azure Container Apps, Azure PostgreSQL, etc.
- Developer CLI - Extendable .NET CLI for DevEx - set up CI/CD is one command and a couple of questions
- AI rules - 30+ rules & workflows for Claude Code - sync to other editors can be enabled via
.gitignore - Multi-agent development - Agent Teams workflow where specialized Claude Code agents with deep PlatformPlatform expertise collaborate end-to-end
Follow our up-to-date roadmap with core SaaS features like SSO, monitoring, alerts, multi-region, feature flags, back office for support, etc.
Show your support for our project - give us a star on GitHub! It truly means a lot! ⭐

TL;DR: Open the PlatformPlatform solution in Rider or Visual Studio and run the Aspire AppHost project.
For development, you need .NET, Docker, and Node. And GitHub and Azure CLI for setting up CI/CD.
Install prerequisites for Windows
-
Open a PowerShell terminal as Administrator and run the following command to install Windows Subsystem for Linux (required for Docker). Restart your computer if prompted.
wsl --install -
From an Administrator PowerShell terminal, use winget (preinstalled on Windows 11) to install any missing packages:
winget install Microsoft.DotNet.SDK.10 winget install Git.Git winget install Docker.DockerDesktop winget install Microsoft.AzureCLI winget install GitHub.cli -
Install Node.js — the version must match
.node-version. We recommend fnm which auto-installs the exact version via the Developer CLI. When using an IDE like Rider, ensure the active fnm version matches.node-version.# Option A: fnm (recommended) winget install Schniz.fnm # Option B: Node.js directly winget install OpenJS.NodeJS
-
(Recommended) Install language servers for enhanced Claude Code support:
npm install -g typescript-language-server typescript
dotnet tool install -g csharp-ls
Install prerequisites for Mac
Open a terminal and run the following commands (if not installed):
-
Install Homebrew, a package manager for Mac
-
Install packages
brew install --cask dotnet-sdk
brew install --cask docker
brew install git azure-cli gh
-
Install Node.js — the version must match
.node-version. We recommend fnm which auto-installs the exact version via the Developer CLI. When using an IDE like Rider, ensure the active fnm version matches.node-version.# Option A: fnm (recommended) brew install fnm # Option B: Node.js directly brew install node
-
(Recommended) Install language servers for enhanced Claude Code support:
npm install -g typescript-language-server typescript
dotnet tool install -g csharp-ls
Install prerequisites for Linux (Ubuntu/Debian)
Open a terminal and run the following commands (if not installed):
-
Install basic tools
sudo apt update && sudo apt install -y git wget curl libnss3-tools -
Add Microsoft package repository
source /etc/os-release
wget https://packages.microsoft.com/config/$ID/$VERSION_ID/packages-microsoft-prod.deb -O packages-microsoft-prod.deb
sudo dpkg -i packages-microsoft-prod.deb
rm packages-microsoft-prod.deb
-
Install .NET SDK and Docker
sudo apt-get update && sudo apt-get install -y dotnet-sdk-10.0 docker.io docker-compose-v2sudo systemctl enable --now docker sudo usermod -aG docker $USER
-
Install Node.js — the version must match
.node-version. We recommend fnm which auto-installs the exact version via the Developer CLI. When using an IDE like Rider, ensure the active fnm version matches.node-version.# Option A: fnm (recommended) curl -fsSL https://fnm.vercel.app/install | bash # Option B: Node.js directly curl -fsSL https://deb.nodesource.com/setup_24.x | sudo -E bash - sudo apt-get install -y nodejs
-
Trust the HTTPS development certificate
echo 'export SSL_CERT_DIR="$HOME/.aspnet/dev-certs/trust:${SSL_CERT_DIR:-/usr/lib/ssl/certs}"' >> ~/.bashrc
source ~/.bashrc
dotnet dev-certs https --trust
-
Log out and log back in to apply Docker group and shell configuration changes.
-
(Recommended) Install language servers for enhanced Claude Code support
npm install -g typescript-language-server typescript
dotnet tool install -g csharp-ls
-
(Optional) If using Snap Chromium, trust the certificate in its sandbox
certutil -d sql:$HOME/snap/chromium/current/.pki/nssdb -L >/dev/null 2>&1 || (mkdir -p $HOME/snap/chromium/current/.pki/nssdb && certutil -d sql:$HOME/snap/chromium/current/.pki/nssdb -N --empty-password)
dotnet dev-certs https --trust
-
(Optional) Install GitHub CLI and Azure CLI (needed for CI/CD setup)
(type -p wget >/dev/null || (sudo apt update && sudo apt-get install wget -y)) \
&& sudo mkdir -p -m 755 /etc/apt/keyrings \
&& wget -qO- https://cli.github.com/packages/githubcli-archive-keyring.gpg | sudo tee /etc/apt/keyrings/githubcli-archive-keyring.gpg > /dev/null \
&& sudo chmod go+r /etc/apt/keyrings/githubcli-archive-keyring.gpg \
&& echo "deb [arch=$(dpkg --print-architecture) signed-by=/etc/apt/keyrings/githubcli-archive-keyring.gpg] https://cli.github.com/packages stable main" | sudo tee /etc/apt/sources.list.d/github-cli.list > /dev/null
sudo apt-get update && sudo apt-get install -y gh
curl -sL https://aka.ms/InstallAzureCLIDeb | sudo bash
git clone https://github.com/platformplatform/PlatformPlatform.gitWe recommend you keep the commit history, which serves as a great learning and troubleshooting resource. 😃
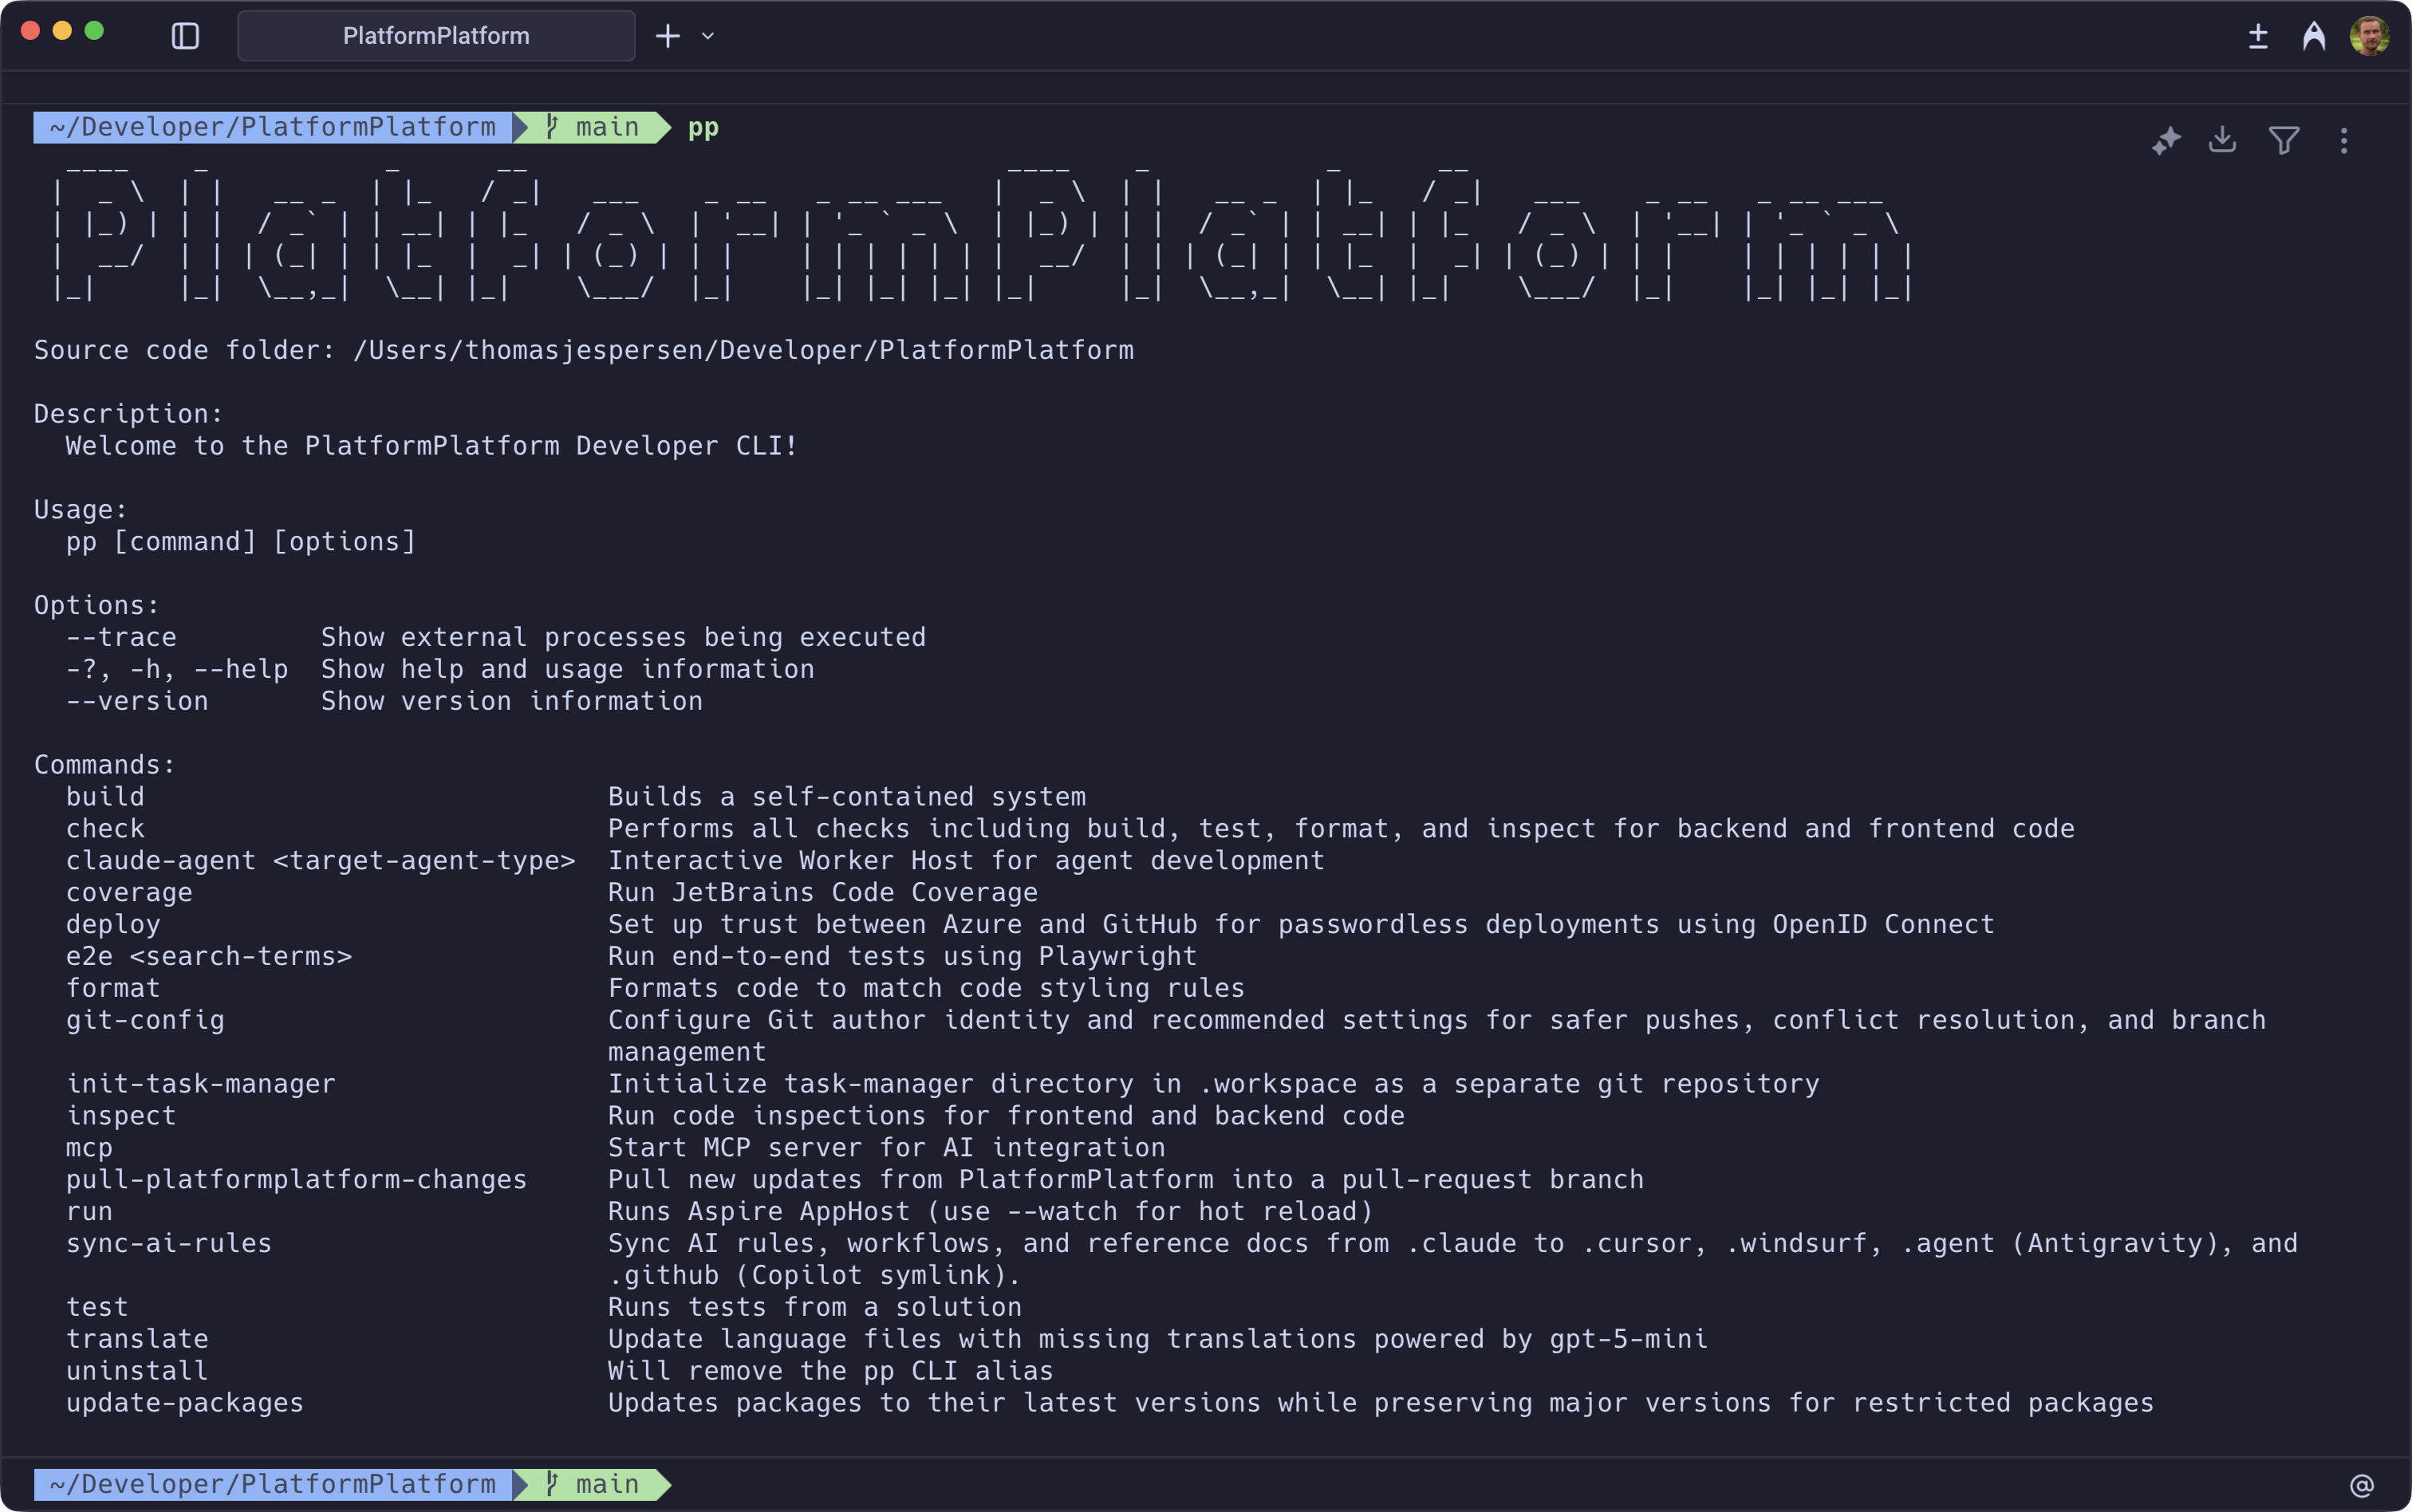
The PlatformPlatform CLI provides convenient commands for common tasks. From the cloned repository, install it globally to use the pp command from anywhere in your terminal.
cd developer-cli
dotnet run install
Restart your terminal to make the pp command available.
Using Aspire, docker images with PostgreSQL, Blob Storage emulator, and development mail server will be downloaded and started. No need to install anything, or learn complicated commands. Simply run this command, and everything just works 🎉
With the CLI installed:
pp run # First time downloading Docker containers will take several minutesOr without the CLI:
cd application/AppHost
dotnet run
Alternatively, open the PlatformPlatform solution in Rider or Visual Studio and run the Aspire AppHost project.
On first startup, Aspire will prompt for stripe-enabled -- enter true to configure Stripe integration (see the optional Stripe setup section below) or false to skip.
Once the Aspire dashboard fully loads, click to the WebApp and sign up for a new account (https://localhost:9000/signup). A one-time password (OTP) will be sent to the development mail server, but for local development, you can always use the code UNLOCK instead of checking the mail server.
PlatformPlatform supports authentication via Google OAuth using OpenID Connect with PKCE. This is optional for local development since email-based one-time passwords work without any configuration. The Aspire dashboard prompts whether to enable Google OAuth on first startup.
Google Cloud Console setup
- Go to Google Cloud Console
- Create a new project (e.g., "YourProduct OAuth")
- Navigate to APIs & Services > Credentials
- Configure OAuth consent screen (first time only):
- App name, support email, audience (External), contact info
- Agree to Google API Services: User Data Policy
- Create OAuth client ID:
- Application type: "Web application"
- Name: "YourProduct Localhost"
- Add Authorized redirect URIs:
https://localhost:9000/api/account/authentication/Google/login/callbackhttps://localhost:9000/api/account/authentication/Google/signup/callback
- Note the Client ID and Client Secret
Aspire parameter configuration (two restarts required):
- First restart: Aspire prompts whether to enable Google OAuth. Enter
trueto enable orfalseto skip. Once entered, restart Aspire. - Second restart: Aspire prompts for the Client ID and Client Secret. Enter the values from the Google Cloud Console, then restart Aspire to apply the configuration.
All values are stored securely in .NET user secrets and persist across restarts.
PlatformPlatform includes a comprehensive Stripe integration for subscription management and payments: embedded Stripe checkout and payment elements, prorated plan upgrades and downgrades, tax management, localized UI and invoice text, refund overview in billing history, telemetry events for the subscription lifecycle, grandfather pricing for existing subscribers, dunning and failed payment recovery, and full sync between Stripe and the local database via webhooks. The Stripe Dashboard must be set up and configured according to the Stripe Dashboard setup guide below before enabling Stripe in Aspire.
Stripe Dashboard setup
Each developer needs their own Stripe sandbox. The local database stays in sync with Stripe via webhook events -- when payments, subscriptions, or billing details change in Stripe, webhook events update the local database with matching customer and subscription IDs. If developers share a sandbox, webhook events from one developer's actions would corrupt another developer's local database.
- Create a sandbox: Go to Stripe Dashboard and create an account. Click the account picker (top-left) > Sandboxes > Create. Name it
dev-yournameand open it. All subsequent steps are performed inside your sandbox. - Create products: Navigate to Product catalog > + Create product. Create a
Standardproduct with Recurring / Monthly pricing (e.g., 19 EUR), then aPremiumproduct (e.g., 39 EUR). Important: Click More pricing options and addstandard_monthlyandpremium_monthlyrespectively in the Lookup key field. - Disable non-card payment methods: Go to Settings (gear icon) > Payments > Payment methods. Turn off every payment method except Cards (and Cartes Bancaires which cannot be disabled)
- Limit to 1 subscription: Go to Settings > Payments > Checkout and Payment Links, scroll to Subscriptions, and enable Limit customers to 1 subscription. Add link to
https://app.yourcompany.com/account/billing(https://localhost:9000/account/billingis not valid) - Configure failed payment recovery: Go to Settings > Billing > Subscriptions and emails > Manage failed payments, and configure desired retry behavior
- Configure email notifications: Go to Settings > Billing > Subscriptions and emails > Email notifications and customer management, and enable all settings as you see fit. Set "Use your own custom link" to
https://localhost:9000/account/billing - Enable 3D Secure: Go to Settings > Billing > Subscriptions and emails > Manage payments that require confirmation, and check off Enable 3D Secure. The embedded Stripe components support showing e.g. Visa and Danish MitID multi-factor confirmation dialogs
- Set invoice prefix: Go to Settings > Billing > Invoices. In the Invoice numbering section, change the Invoice prefix to something meaningful for your organization, and optionally reset the Invoice sequence if needed
- Disable payment link in invoice emails: Go to Settings > Billing > Invoices and uncheck Include a link to a payment page in the invoice email
- Set up Tax: Go to More > Tax > Locations > + Add test registration and follow the guide. Below is an example for a Danish company (adapt based on your business):
- Fill out the "Add head office address" side pane with your company address. Click Continue
- In "Add Tax registration" select your country (e.g., Denmark) and I'm already registered. Click Continue
- Select Domestic (e.g., "registered in Denmark"). Click Continue
- Select No to "Do you want to collect VAT on cross-border sales...". Click Continue
- Select Yes to "Have your sales of goods or digital services... been less than EUR 10,000". Click Continue
- Select Start collecting immediately in "Schedule tax collection". Click Continue
- Select Software as a service (SaaS) - business use in "Confirm your tax rates" (should show 25% for Denmark). Click Start collecting
- Get API keys: Navigate to Developers > API keys. Note the Publishable key (
pk_test_...) and Secret key (sk_test_...). These will be needed for the Aspire configuration below.
Aspire parameter configuration (two restarts required):
- First restart: Aspire prompts for the Publishable key and Secret key (API key). Once entered, the Stripe CLI container starts and connects to Stripe. Find the generated webhook signing secret in either:
- The Stripe Dashboard under Developers > Workbench > Webhooks -- click the three-dot menu on the event destination to reveal the signing secret
- The stripe-cli container logs in the Aspire dashboard (look for "Your webhook signing secret is whsec_...")
- Second restart: Aspire prompts for the Webhook secret. Enter the
whsec_value from the previous step.
All values are stored securely in .NET user secrets and persist across restarts.
Run this command to automate Azure Subscription configuration and set up GitHub Workflows for deploying Azure Infrastructure (using Bicep) and compiling application code to Docker images deployed to Azure Container Apps:
cd developer-cli
dotnet run deploy # Tip: Add --verbose-logging to show the used CLI commands
You need to be the owner of the GitHub repository and the Azure Subscription, plus have permissions to create Service Principals and Active Directory Groups.
The command will first prompt you to login to Azure and GitHub, and collect information. You will be presented with a complete list of changes before they are applied. It will look something like this:
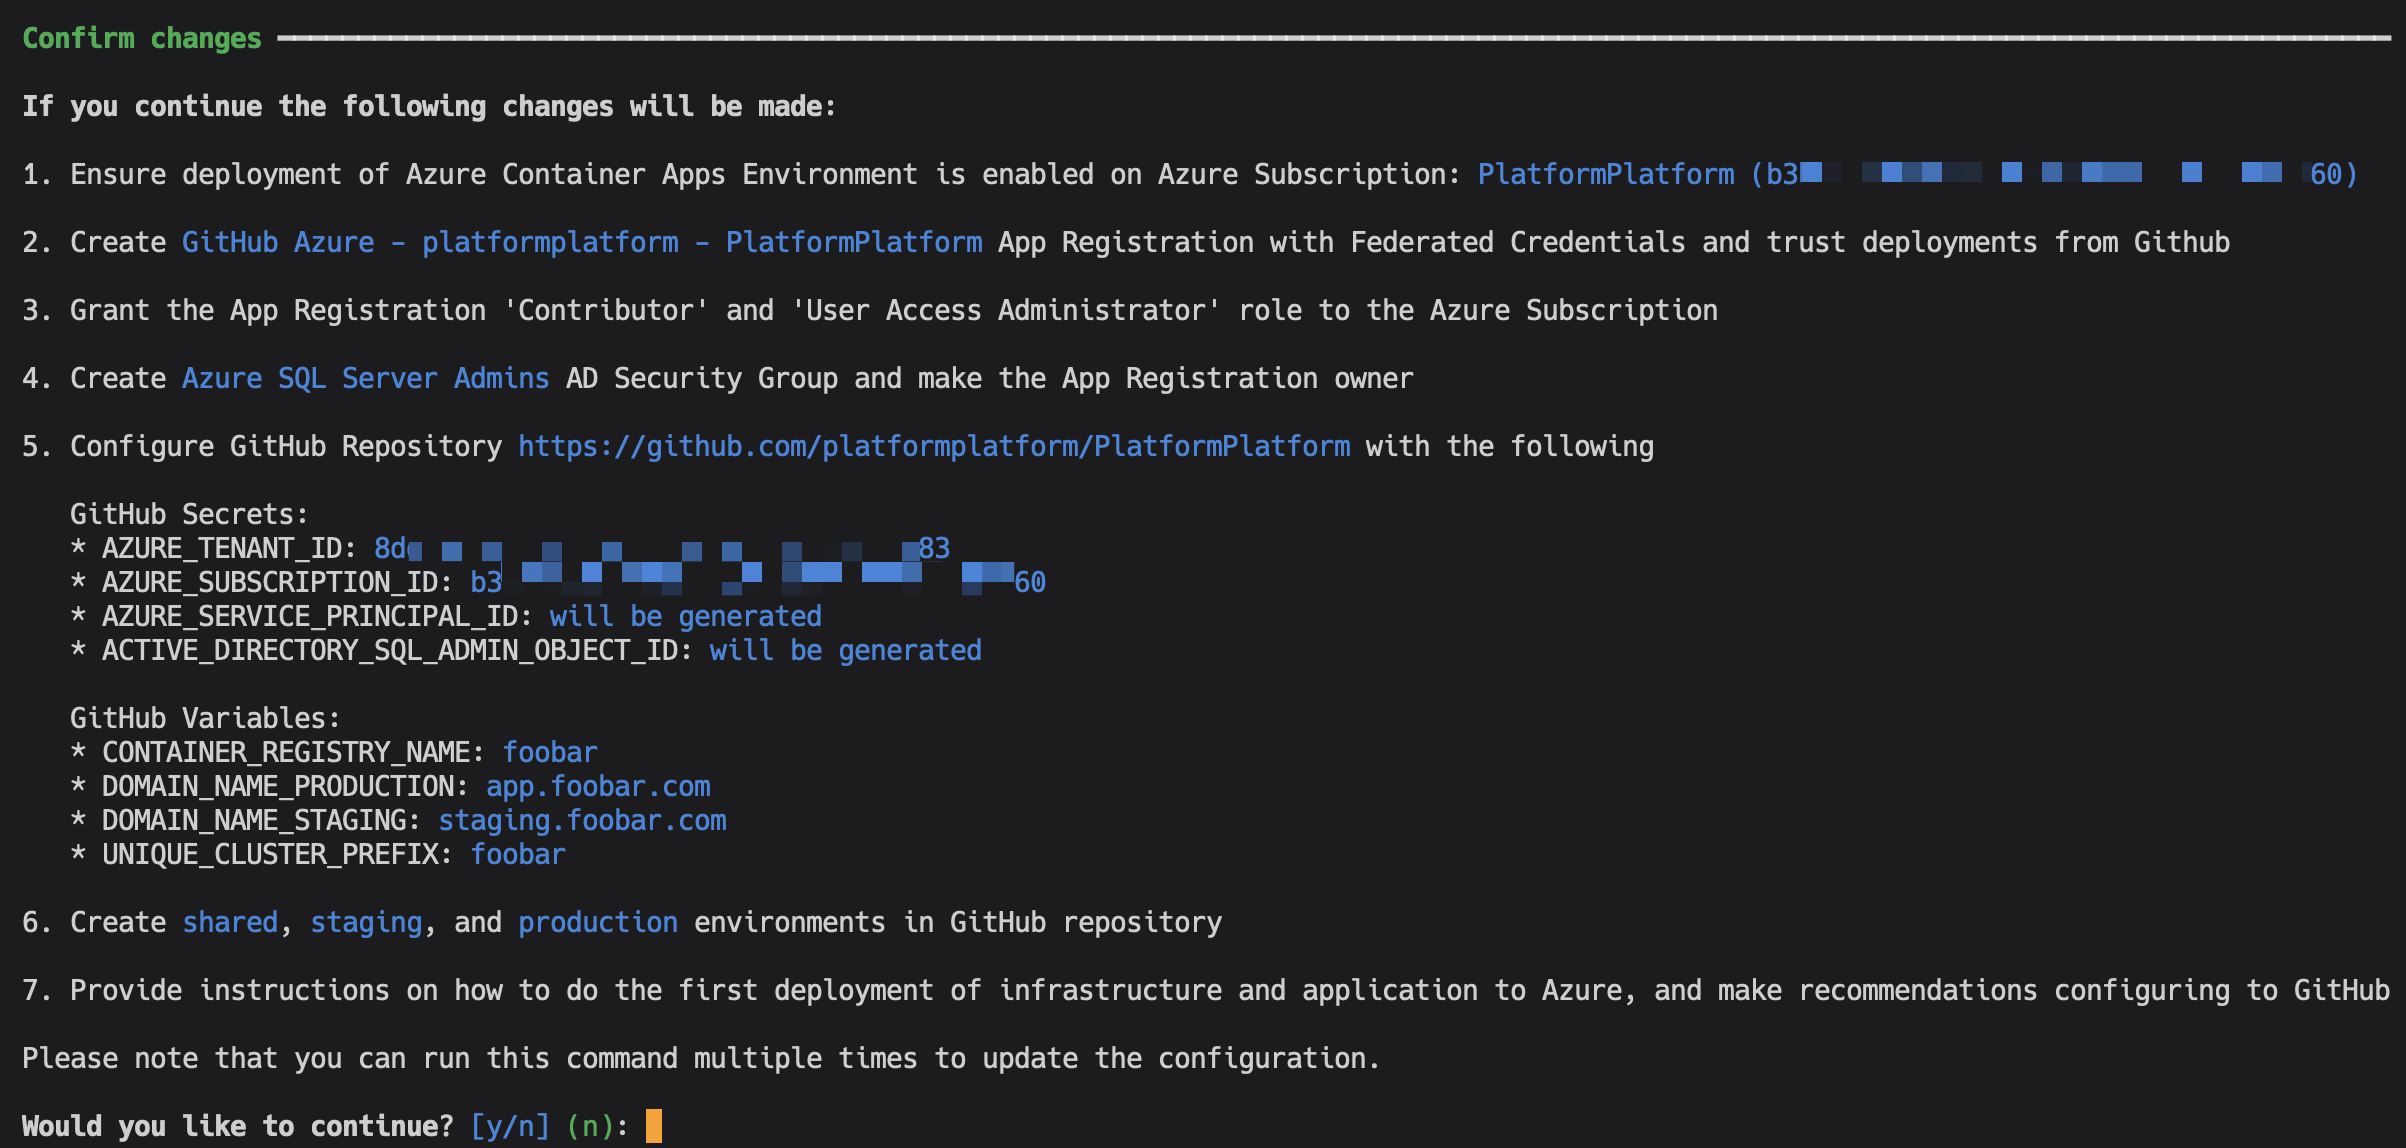
Except for adding a DNS record, everything is fully automated. After successful setup, the command will provide simple instructions on how to configure branch policies, Sonar Cloud static code analysis, and more.
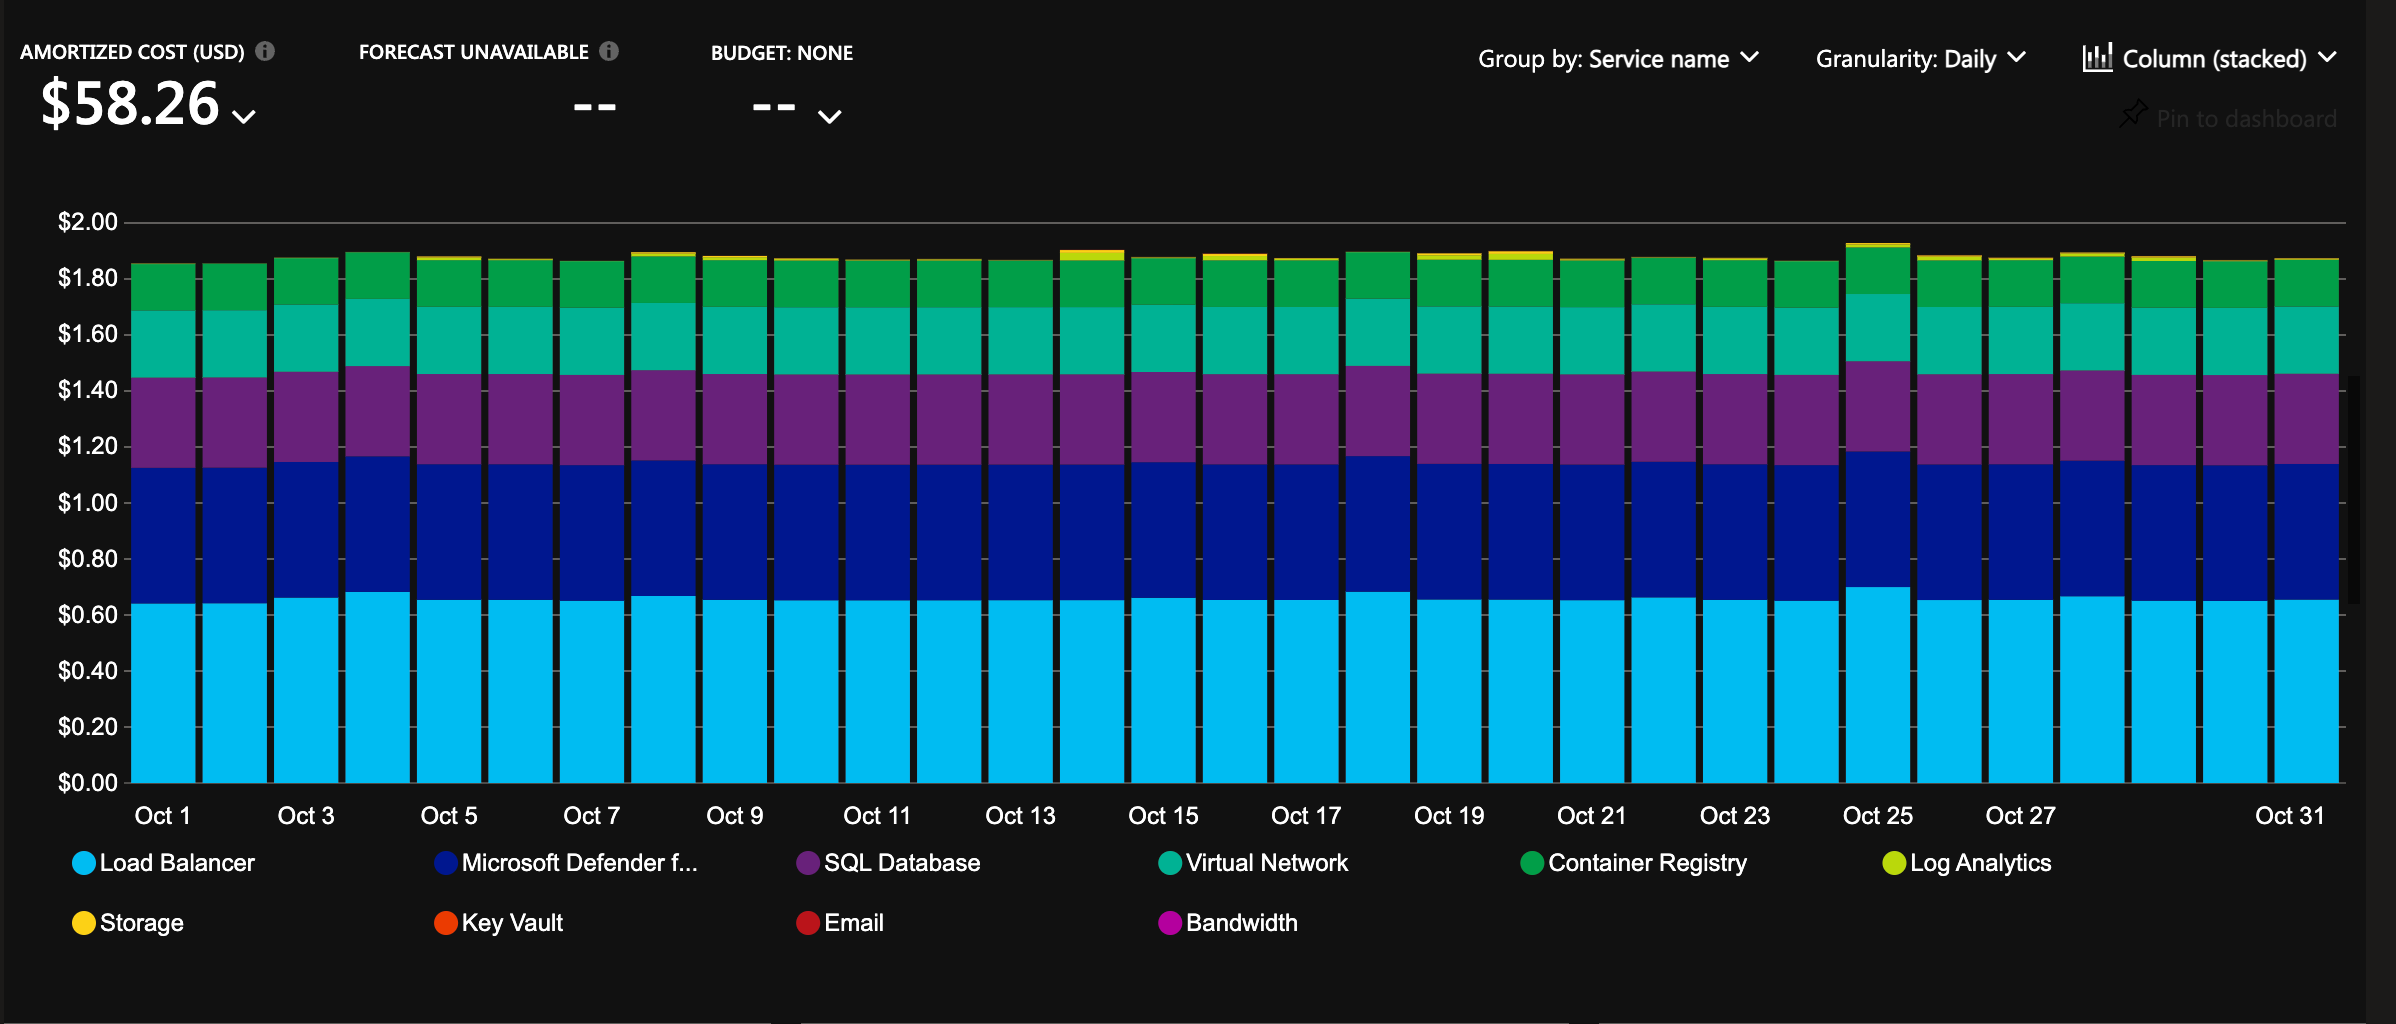
The infrastructure is configured with auto-scaling and hosting costs in focus. It will cost less than 2 USD per day for a cluster, and it will allow scaling to millions of users 🎉
If you set up Google OAuth locally, use the Developer CLI to store your Google OAuth credentials as GitHub secrets for deployment to Azure Key Vault:
pp github-configRemember to add redirect URIs for each environment in your Google Cloud Console configuration, e.g.:
https://staging.yourproduct.com/api/account/authentication/Google/login/callbackhttps://staging.yourproduct.com/api/account/authentication/Google/signup/callbackhttps://app.yourproduct.com/api/account/authentication/Google/login/callbackhttps://app.yourproduct.com/api/account/authentication/Google/signup/callback
Create a separate Stripe account (or sandbox) for each environment. For production, use a live Stripe account instead of a sandbox. Follow the Stripe Dashboard setup steps in section 3.2 to configure products, payment methods, tax, invoices, and other settings.
On localhost, the Stripe CLI container automatically forwards webhook events. On staging and production, you need to configure a webhook endpoint manually in the Stripe Dashboard:
- Go to Developers > Webhooks > Add destination
- Keep Your account selected. Under events, select the Charge, Checkout, Credit Note, Customer, Invoice, Payment Intent, Payment Method, Price, Product, Refund, Setup Intent, and Subscription Schedule categories (roughly 91 events as of March 2026, though Stripe may add or remove events over time). Do not use Select all as it includes v2 thin-payload events the handler does not support. Click Continue
- Select Webhook endpoint as the destination type
- Set the Destination name to the environment (e.g.,
StagingorProduction), set the Endpoint URL tohttps://app.yourproduct.com/api/account/subscriptions/stripe-webhook(replace with your actual domain), and click Continue - On the destination detail page, click Reveal under Signing secret to get the webhook secret (
whsec_...)
Use the Developer CLI to store Stripe credentials as GitHub secrets for deployment to Azure Key Vault:
pp github-configSelect the Stripe group and enter the Publishable Key, API Key (Secret key), and Webhook Secret (the signing secret from the webhook endpoint). The subscription feature is automatically enabled on Azure when all three secrets are present in Key Vault.
PlatformPlatform includes a multi-agent autonomous development workflow powered by Claude Code Agent Teams. Specialized AI agents collaborate to deliver complete features, from requirements to production-ready code, while enforcing enterprise-grade quality standards.
The entire process can take several hours depending on complexity, but at the end you get a fully implemented feature: backend logic, database migrations, API endpoints, frontend UI, localization, and end-to-end tests. All committed. All tests passing. Ready to ship.
The agents work like a real engineering team, inside the tools you already use. Features and tasks live in your existing product management system (Linear, Azure DevOps, Jira, or markdown files on disk), not in a bespoke AI-only tracker. Write the feature and tasks yourself, or have the team lead interview you and create them for you. From there, the team lead delegates to engineers, who move tasks from planned to active when they start. Reviewers move them to review. The Guardian moves them to completed on a successful commit. You watch progress, comment on tasks, reprioritize, add bugs mid-flight, or restart tasks the agents got wrong, exactly the same way you would with a human team. The full audit trail lives in your product management tool alongside all your other work.

Zero-tolerance code reviews: AI agents follow rules well until they hit problems, then cut corners, which is why many struggle to get AI to write production-ready code. Dedicated reviewer agents catch this. They reject any code that can objectively be made better: compiler warnings, static analysis errors, browser console warnings, or deviation from established patterns. All warnings including warnings in seemingly unrelated parts of the system are fixed. This boy scout rule approach ensures every commit meets production standards.
Native Agent Teams coordination: Built on Claude Code's Agent Teams primitives: TeamCreate, Task with team_name, SendMessage, and a shared TaskList. The team lead spawns and coordinates all agents automatically.
Real collaboration via SendInterruptSignal: Native Agent Teams are fragile out of the box. Agents treat SendMessage like an inbox: they finish their current task fully before reading the next message, so a team lead that sends a nudge mid-flight never hears back. Team leads then assume the agent is stuck, spawn replacements, and the new agents behave the same way. PlatformPlatform ships a custom MCP command, SendInterruptSignal, that solves this. It pairs with an ID-correlated follow-up SendMessage and is auto-delivered by a PostToolUse hook as a blocking error on the target agent's next tool call. Agents skip stale queued messages until they find the matching interrupt ID. Engineers interrupt QA when contracts change. Reviewers interrupt engineers with in-progress findings. The result is agents that truly collaborate in real time instead of talking past each other.
Plan before acting: The team lead always starts in plan mode. Before spawning any agents, it investigates the work, then presents a plan describing which agents will be spawned, what each will do, and the expected sequence. Implementation begins only once the user approves. Small tasks get brief plans, large tasks get detailed plans.
Parallel execution with task sets: Backend, frontend, and E2E tracks run concurrently within each task set. Engineers implement in parallel, reviewers validate independently, and the Guardian commits everything in dependency order once all tracks are approved.
Guardian-owned commits: A dedicated Guardian owns all git writes. Reviewers send one approval message per track with the full file list; the Guardian stages it atomically. Once every track is staged, the Guardian runs the pre-commit pipeline (build, test, format, lint, Aspire restart, smoke tests) and commits in dependency order. No other agent touches git.
Explicit task status ownership: Every status transition has exactly one owner. Engineers move tasks from planned to active when starting. Reviewers move active to review when reviewing. Engineers move review back to active when fixing findings. The Guardian moves review to completed on a successful commit. Each agent verifies the expected state before acting, so status changes are auditable and never drift silently.
Andon cord: Every agent acts as a quality stop-signal. If something is off (a task in the wrong status, uncommitted changes from a previous task, validation failures that cannot be resolved, any warning or error signal), the agent pulls the andon cord: stop work and escalate to the team lead. The team lead treats andon cord escalations as highest priority and resolves them before any other work continues.
Architect coherence across task sets: A persistent architect agent tracks how implementation evolves. Engineers discuss with the architect when they need to diverge from the plan during development. After each commit, the architect reads divergence notes and updates upcoming tasks when the implementation reveals something that changes future plans.
Continuous regression testing: A regression tester runs visual and functional tests via Claude in Chrome browser automation throughout the implementation, catching UI regressions and console errors in real time.
Cross-team collaboration: Agents talk to each other directly, not through the team lead. If the frontend engineer needs a backend API change, they message the backend engineer, wait for implementation, then continue. QA notifies engineers when tests expose bugs. The team lead stays out of the loop on day-to-day chatter and only steps in to redirect or unblock.
No context window exhaustion: With specialized agents for each domain, no single agent accumulates context bloat. Fresh engineer and reviewer pairs are spawned for each task set, always starting with a clean context window while persistent agents (guardian, architect, regression tester) maintain continuity across the feature.
Tool-agnostic product management: A single PRODUCT_MANAGEMENT_TOOL configuration value maps generic [feature], [task], and [subtask] terminology to the chosen tool. Configure the MCP server for your tool once and you are set. Agents resolve tool-specific details (status names, API shapes, ID formats) via .claude/reference/product-management/{tool}.md at runtime. Swap tools without changing agents.
Team lead (launched via the developer CLI):
- Coordinates the full agent team. Spawns all sub-agents, delegates work, and tracks progress. Never writes code directly
Persistent agents (alive for the whole feature):
- guardian: Owns all git commits, Aspire restarts, and final validation. Zero tolerance for failures
- architect: Tracks implementation evolution across task sets, reviews divergence notes, and updates upcoming tasks
- regression-tester: Continuous visual and functional testing via Claude in Chrome
- researcher: Investigation specialist. Spawned on the first research request and reused for subsequent questions. Reports findings but never writes code
Fresh agents (spawned per task set by the team lead):
- backend, frontend, qa: Engineers who implement code within their specialty
- backend-reviewer, frontend-reviewer, qa-reviewer: Zero-tolerance gatekeepers who review line-by-line, then send one approval message per track to the Guardian for atomic staging and commit
This workflow requires Claude Code and will not work with other AI coding assistants.
git checkout -b feature-namePick a tool. The name must match a file in .claude/reference/product-management/: Linear, AzureDevOps, Jira, or Markdown (for tracking features and tasks as markdown files in your repo).
Set the value in AGENTS.md:
PRODUCT_MANAGEMENT_TOOL="Linear"
Then configure the MCP server for that tool. Each reference file contains the exact MCP configuration under its MCP Configuration section (e.g., Linear.md). The Markdown option needs no MCP, since it reads and writes local files directly.
Start the team lead agent using the Developer CLI:
pp claude-agent team-leadUse the /create-prd skill. The team lead will guide you through a brief interview to understand what you want to build, then generate a complete feature specification with tasks in your configured product management tool (Linear, Azure DevOps, Jira, GitHub, or markdown files).
Tell the team lead which feature to implement by providing the title or ID. From here, the team lead spawns all the agents automatically: guardian, architect, regression tester, and fresh engineer/reviewer pairs for each task set.
Backend and frontend engineers work in parallel. QA writes tests alongside implementation and runs them once backend and frontend are approved and staged. Reviewers scrutinize every change line by line and send one approval message per track. The Guardian runs the pre-commit pipeline (build, test, format, lint, Aspire restart, smoke tests) once all tracks are staged, then commits in dependency order (backend, frontend, E2E).
For smaller tasks, bug fixes, or exploratory work that don't need the full agent team, use the pair programmer instead:
pp claude-agent pair-programmerThe pair programmer is a standalone agent that works directly with you as a hands-on collaborator. It is not part of the agent team workflow above. It can spawn sub-agents when the task benefits from parallel work or code review.
PlatformPlatform is a monorepo containing all application code, infrastructure, tools, libraries, documentation, etc. A monorepo is a powerful way to organize a codebase, used by Google, Facebook, Uber, Microsoft, etc.
.
├─ .claude               # Claude Code agent definitions and team configurations
│  ├─ agents             # Agent Teams agent definitions (team-lead, engineers, reviewers, etc.)
│  ├─ commands           # Slash commands and workflows
│  ├─ hooks              # Claude Code hooks to enforce MCP tool usage and prevent dangerous git operations
│  └─ rules              # AI rules for code generation patterns
├─ .github               # GitHub configuration and CI/CD workflows
├─ application           # Contains the application source code
│  ├─ AppHost            # Aspire project starting app and all dependencies in Docker
│  ├─ AppGateway         # Main entry point for the app using YARP as a reverse proxy
│  ├─ main               # Primary SCS and shell app -- build your product here
│  │   ├─ WebApp         # React SPA frontend using TypeScript and ShadCN 2.0 with Base UI
│  │   ├─ Api            # Presentation layer exposing the API to WebApp or other clients
│  │   ├─ Core           # Core business logic, application use cases, and infrastructure
│  │   ├─ Workers        # Background workers for long-running tasks and event processing
│  │   └─ Tests          # Tests for the Api, Core, and Workers
│  ├─ account            # Federated module for authentication, user and account management
│  │   ├─ WebApp         # React SPA loaded into main via Module Federation
│  │   ├─ Api            # Presentation layer exposing the API to WebApp or other clients
│  │   ├─ Core           # Core business logic, application use cases, and infrastructure
│  │   ├─ Workers        # Background workers for long-running tasks and event processing
│  │   └─ Tests          # Tests for the Api, Core, and Workers
│  ├─ back-office        # Standalone SCS for operations and support (separate login)
│  │   ├─ WebApp         # React SPA frontend using TypeScript and ShadCN 2.0 with Base UI
│  │   ├─ Api            # Presentation layer exposing the API to WebApp or other clients
│  │   ├─ Core           # Core business logic, application use cases, and infrastructure
│  │   ├─ Workers        # Background workers for long-running tasks and event processing
│  │   └─ Tests          # Tests for the Api, Core, and Workers
│  ├─ shared-kernel      # Reusable components and default configuration for all systems
│  └─ shared-webapp      # Reusable ShadCN 2.0 components with Base UI that affect all systems
├─ cloud-infrastructure  # Contains Bash and Bicep scripts (IaC) for Azure resources
│  ├─ cluster            # Scale units like production-west-eu, production-east-us, etc.
│  ├─ environment        # Shared resources like App Insights, Container Registry, etc.
│  └─ modules            # Reusable Bicep modules like Container App, PostgreSQL, etc.
└─ developer-cli         # A .NET CLI tool for automating common developer tasks
** A Self-Contained System is a large microservice (or a small monolith) that contains the full stack, including frontend, background jobs, etc. The main SCS is the shell application with catch-all routing where you build your product. The account SCS is loaded into main via Module Federation, enabling seamless navigation between product pages and account pages without full page reloads. The back-office SCS runs as a fully standalone application with its own login.
The backend is built using the most popular, mature, and commonly used technologies in the .NET ecosystem:
- .NET 10 and C# 14
- Aspire
- YARP
- ASP.NET Minimal API
- Entity Framework
- MediatR
- FluentValidation
- Mapster
- XUnit, FluentAssertions, NSubstitute, and Bogus
- SonarCloud and JetBrains Code style and Cleanup
Read more about the backend architecture
- Vertical Slice Architecture: The codebase is organized around vertical slices, each representing a feature or module, promoting separation of concerns and maintainability.
- Domain-Driven Design (DDD): DDD principles are applied to ensure a clear and expressive domain model.
- Command Query Responsibility Segregation (CQRS): This clearly separates read (query) and write (command) operations, adhering to the single responsibility principle (each action is in a separate command).
- Screaming architecture: The architecture is designed with namespaces (folders) per feature, making the concepts easily visible and expressive, rather than organizing the code by types like models and repositories.
- MediatR pipelines: MediatR pipeline behaviors are used to ensure consistent handling of cross-cutting concerns like validation, unit of work, and handling of domain events.
- Strongly Typed IDs: The codebase uses strongly typed IDs, which are a combination of the entity type and the entity ID. This is even at the outer API layer, and Swagger translates this to the underlying contract. This ensures type safety and consistency across the codebase.
- JetBrains Code style and Cleanup: JetBrains Rider/ReSharper is used for code style and automatic cleanup (configured in
.DotSettings), ensuring consistent code formatting. No need to discuss tabs vs. spaces anymore; Invalid formatting breaks the build. - Self-contained systems: The codebase is organized into self-contained systems. A self-contained system is a large microservice (or a small monolith) that contains the full stack including frontend, background jobs, etc. These can be developed, tested, deployed, and scaled in isolation, making it a good compromise between a large monolith and many small microservices. Unlike the popular backend-for-frontend (BFF) style with one shared frontend, this allows teams to work fully independently. The main SCS is the shell application where you build your product.
- Shared Kernel: The codebase uses a shared kernel for all the boilerplate code required to build a clean codebase. The shared kernel ensures consistency between self-contained systems, e.g., enforcing tenant isolation, auditing, tracking, implementation of tactical DDD patterns like aggregate, entities, repository base, ID generation, etc.
The frontend is built with these technologies:
- React 19
- TypeScript
- ShadCN 2.0 with Base UI
- Tanstack Router
- Tanstack Query
- Lingui for internationalization (i18n)
- oxlint and oxfmt for linting and formatting
- Node
PlatformPlatform's cloud infrastructure is built using the latest Azure Platform as a Service (PaaS) technologies:
- Azure Container Apps
- Azure Database for PostgreSQL
- Azure Blob Storage
- Azure Service Bus
- Azure Key Vault
- Azure Application Insights
- Azure Log Analytics
- Azure Virtual Network
- Azure Managed Identities
- Azure Container Registry
- Azure Communication Services
- Microsoft Defender for Cloud
Read more about this enterprise-grade architecture
- Platform as a Service (PaaS) technologies: Azure is the leading Cloud Service Provider (CSP) when it comes to PaaS technologies. PlatformPlatform uses PaaS technologies which are fully managed by Microsoft, as opposed to Infrastructure as a Service (IaaS) technologies where the customer is responsible for the underlying infrastructure. This means that Microsoft is responsible for the availability of the infrastructure, and you are only responsible for the application and data. This makes it possible for even a small team to run a highly scalable, stable, and secure solution.
- Enterprise-grade security with zero secrets:
- Managed Identities: No secrets are used when Container Apps connect to e.g. Databases, Blob Storage, and Service Bus. The infrastructure uses Managed Identities for all communication with Azure resources, eliminating the need for secrets.
- Federated credentials: Deployment from GitHub to Azure is done using federated credentials, establishing a trust between the GitHub repository and Azure subscription based on the repository's URL, without the need for secrets.
- No secrets expires: Since no secrets are used, there is no need to rotate secrets, and no risk of secrets expiring.
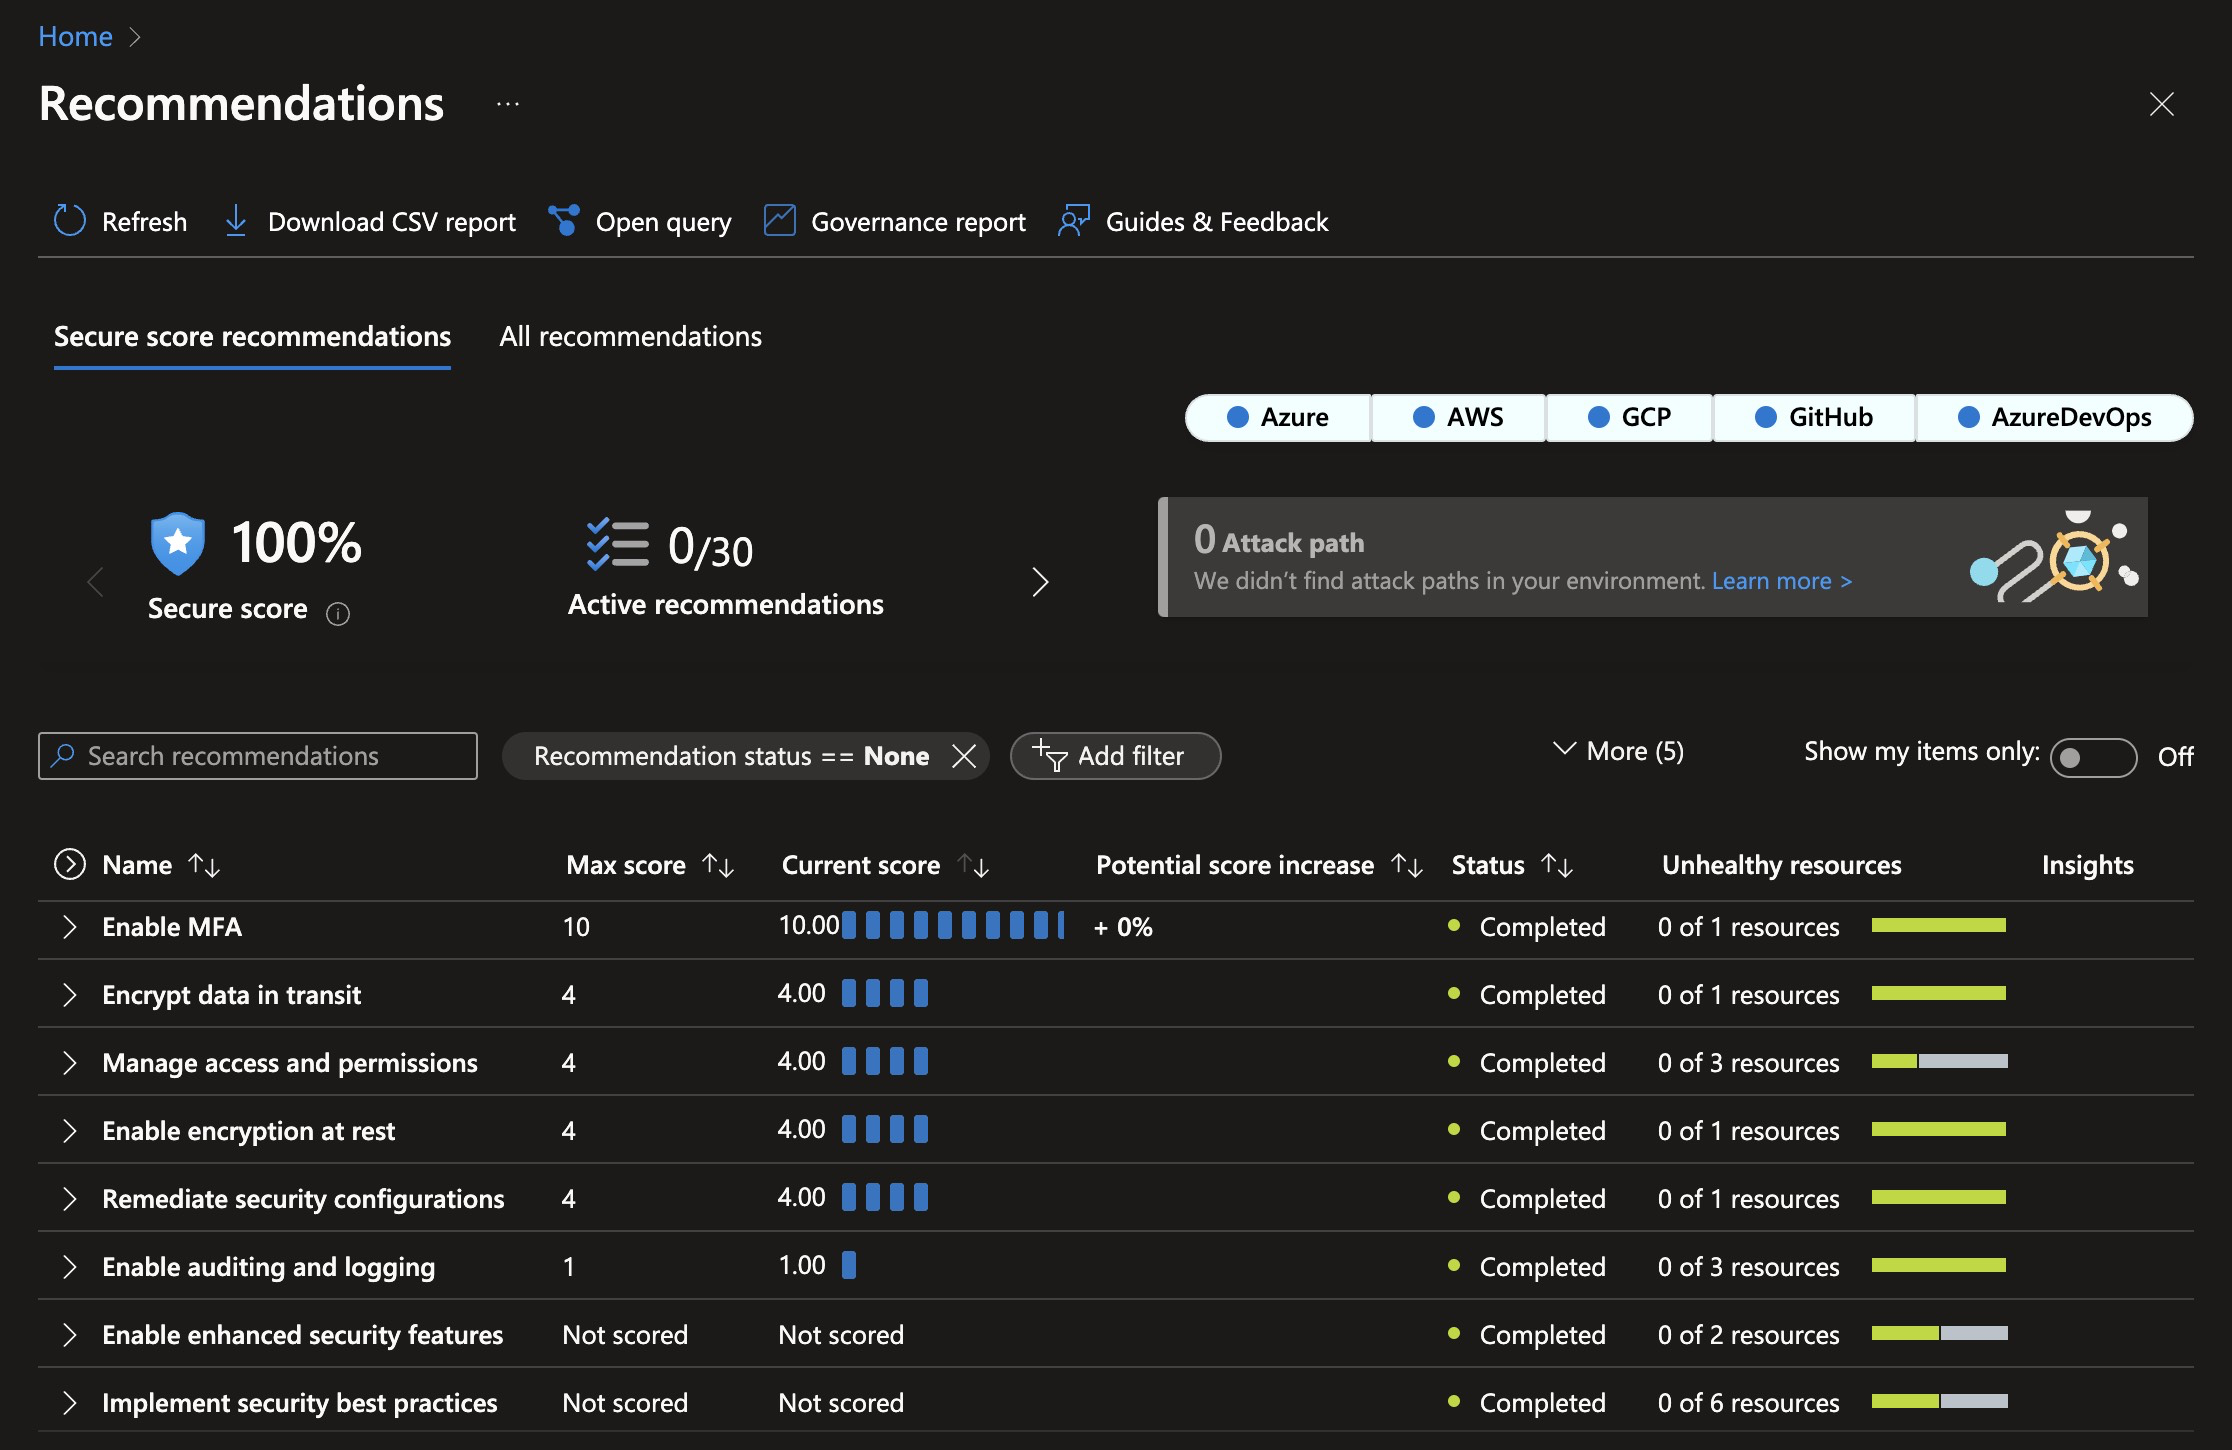
- 100% Security Score: The current infrastructure configuration follows best practices, and the current setup code achieves a 100% Security Score in Microsoft Defender for Cloud. This minimizes the attack surface and protects against even sophisticated attacks.
- Automatic certificate management: The infrastructure is configured to automatically request and renew SSL certificates, eliminating the need for manual certificate management.
- Multiple environments: The setup includes different environments like Development, Staging, and Production, deployed into clearly named resource groups within a single Azure Subscription.
- Multi-region: Spinning up a cluster in a new region is a matter of adding one extra deployment job to the GitHub workflow. This allows customers to select a region where their data is close to the user and local data protection laws like GDPR, CCPA, etc. are followed.
- Azure Container Apps: The application is hosted using Azure Container Apps, which is a new service from Azure that provides a fully managed Kubernetes environment for running containerized applications. You don't need to be a Kubernetes expert to run your application in a scalable and secure environment.
- Scaling from zero to millions of users: The Azure Container App Environment is configured to scale from zero to millions of users, and the infrastructure is configured to scale automatically based on load. This means the starting costs are very low, and the solution can scale to millions of users without any manual intervention. This enables having Development and Staging environments running with very low costs.
- Azure PostgreSQL: The database is hosted using Azure Database for PostgreSQL Flexible Server, which is a fully managed PostgreSQL database. PostgreSQL is known for its high performance, stability, scalability, and security. The server will easily handle millions of users with single-digit millisecond response times.
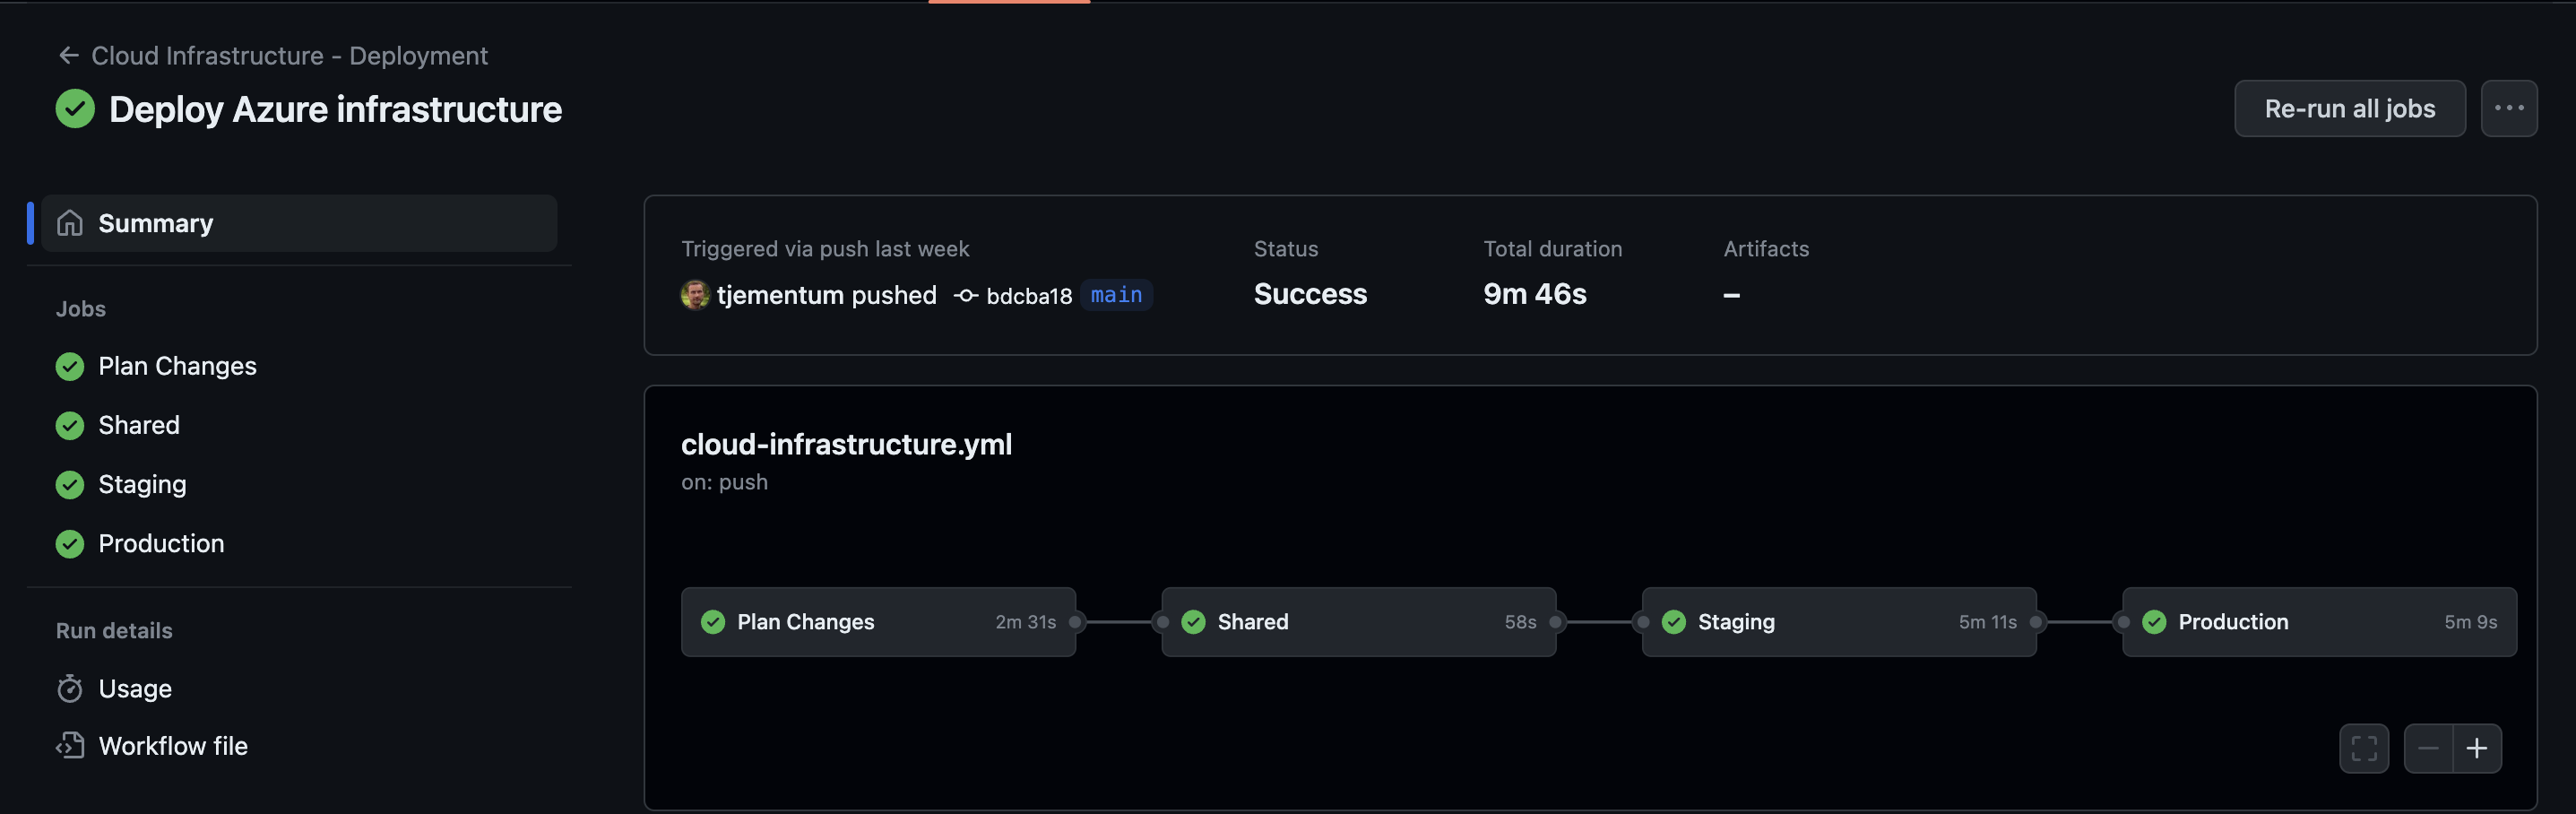
This is how it looks when GitHub workflows has deployed Azure Infrastructure:
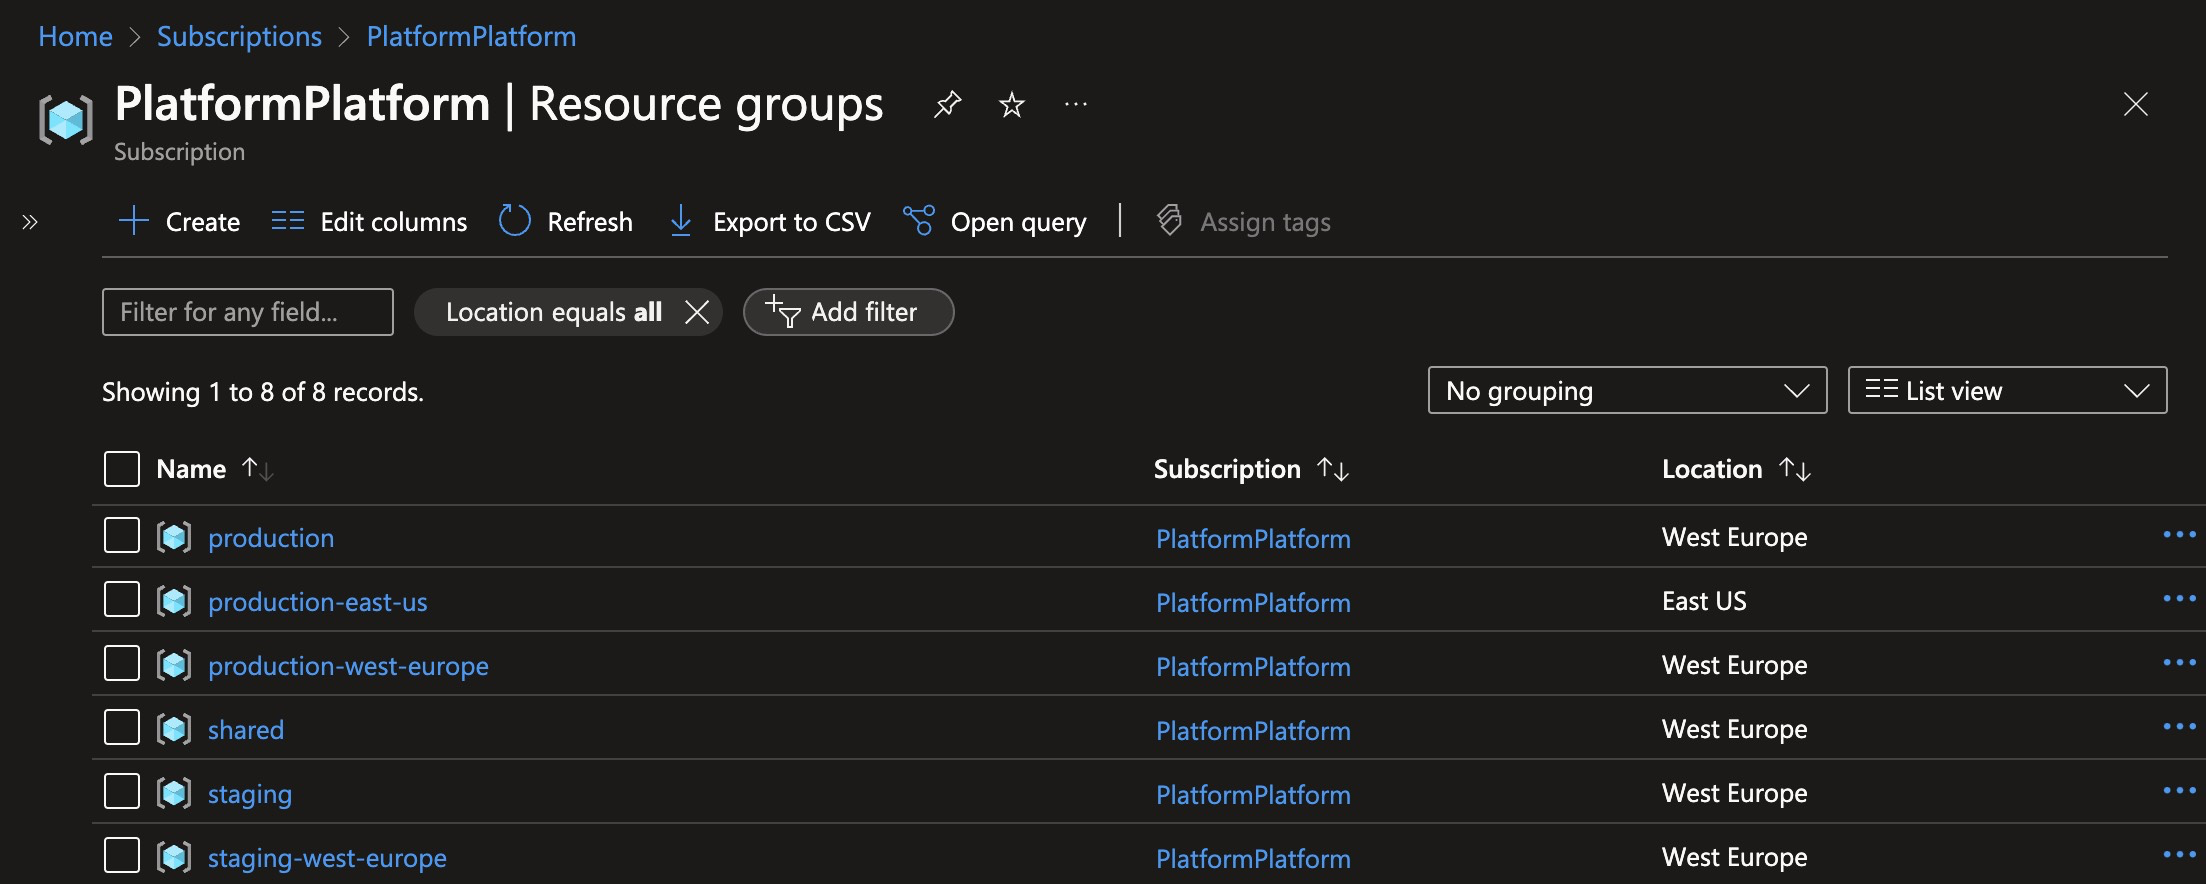
These are the resource groups created when deploying one staging cluster, and two production clusters:
This is the security score after deploying PlatformPlatform resources to Azure. Achieving a 100% security score in Azure Defender for Cloud without exemptions is not trivial.